A Hassle Free Way to Carve a Beautiful Halloween Pumpkin
Forget trying to draw and trace complicated shapes. Cookie cutters are the way to go.
We think this tip from Fresh Home Ideas is simply brilliant. This year try adding cookie cutters and a mallet to your pumpkin carving arsenal for perfect shapes and beautiful designs.
Before you begin, carefully cut a circle around the pumpkin stem, lift off the lid and remove the seeds from the lid and inside the pumpkin.
Here are the five easy steps they provided:
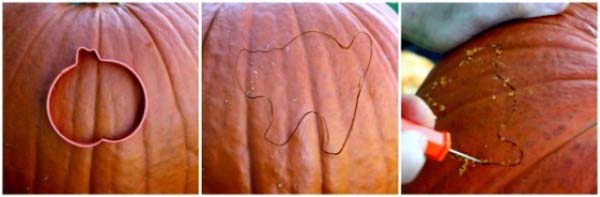
Step 1: Tap Cookie Cutter

Place a cookie cutter on the pumpkin and tap firmly with a rubber mallet until at least half of the cutter has pierced the pumpkin’s shell. (If the pumpkin shell is thin, the cutter may be pounded all the way through the shell.)
Step 2: Remove Cookie Cutter

Remove the cookie cutter, using a needle-nose pliers if needed.
Step 3: Carve Pumpkin

With a small serrated knife (or the serrated saw from a pumpkin carving kit), follow the pattern made from the cookie cutter to cut out the image, making sure to cut all the way through the shell.
Step 4: Remove Shapes

With one hand inside the pumpkin, push out cookie cutter image from the pumpkin and discard.
Step 5: Insert Candle

Place candle inside pumpkin and secure to bottom with hot wax.
Eager to carve your Halloween pumpkin but worried it will be a moldy mess before the 31st? Believe it or not this little packet will do the trick.

Check out how to keep your pumpkins from molding here: http://bit.ly/SulTq0
Sorry, there are no polls available at the moment.Images via Mommy’s Kitchen & Fresh Home Ideas
Lindsay Listanski
Lindsay is the the Director of Media Engagement for Coldwell Banker Real Estate and manages the brand’s media and social media department. She is also a licensed real estate professional. In 2017 & 2018, she was named a top 20 social influencer in the real estate industry in the annual Swanepoel 200 power rankings.
Lindsay lives in Livingston, NJ with her college sweetheart and now husband Joe and rwelcomed another Joe into her life as she became a mom in June 2016.


5 Comments
Real Estate Headlines for the Almost End of October | Coldwell Banker Blue Matter
October 22, 2012[…] For those who still haven’t gotten a pumpkin for their home, here’s a look at how to carve a pumpkin without the hassle. […]
Sarah Elizabeth Arnold
October 22, 2012Thanks! Good stuff:)
Christine
October 20, 2014Love this! Such a great idea!
Heather and Steve Ostrom
October 27, 2014Great stuff Lindsay. My hands hurt so quickly so this definitely what we’re doing with the little kids. 🙂 Thanks for the share and nice idea with the silica too.
Easy Pumpkin Carving, Appraising The White House, And More - Real Estate News and Advice - realtor.com
August 17, 2015[…] Easy Ways To Carve A Halloween Pumpkin [Coldwell Banker] […]