Painting a room or two in your Philadelphia home can give it a new lease on life. While many people are excited to redo their homes by painting the walls, painting the ceiling is often overlooked. It could be that painting your ceiling is considered more difficult or that there’s a greater risk of making a mess when you work above your head. That might be the case, but painting the ceiling is a must if you want to create a uniform, newly redone look throughout the room. Otherwise, you’re likely to end up with four fresh-looking walls and a drab and tired ceiling.
When painting your ceiling, invest in the best quality products you can. A lambswool roller, for example, will apply paint more smoothly and thickly than a cheaper, synthetic roller. Paint that is specially formulated for ceilings will go on smoothly and is less likely to splatter. Here are a few more tips to help you paint your ceiling.
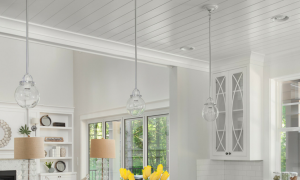
Choosing Your Ceiling Color
White is often the go-to ceiling color in many Philadelphia homes. Sticking with white has its advantages: It makes the room look taller and can brighter up a dim or dark room. But don’t feel you’re stuck with white.
Another option is to paint the ceiling the same color as the rest of the walls. When all five walls of a room are the same color, you create a uniform appearance.
For a subtle bit of contrast, pick a color for the ceiling that is one shade darker or one shade lighter than your walls. A lighter ceiling color will open up the room, while a darker shade can make the space feel more cozy.
Sand and Smooth First
Before you touch any paint, you want to prepare the surface of the ceiling. Get rid of bumps by sanding the area before you start painting. Get ready for an arm workout here, as it’s easiest to sand your ceiling using a pole and 100-grit sandpaper. Once you’ve sanded the area, wipe it down with a damp sponge to remove any dust.
Don’t Be Shy About Cutting In
One important step when painting your ceiling is cutting in along the edges. Use a two-inch paintbrush to paint a line that’s about three inches thick along the edge of the ceiling, where it meets the wall. Paint a line that is about five feet long, starting at one corner. Then paint another five-foot line, starting at the same corner and going along the adjacent wall. You can cut in on all four sides at first, but it is often easier to cut in small sections, then paint with the roller. That way, you can blend the paint while it is still wet.
Roll in a Straight Line
Once you’ve cut in a few feet, break out the paint roller. Start at the corner of the ceiling and pull the roller towards yourself, in a straight line. Move over slightly, then paint another straight line. When you’ve covered the initial cut-in area, turn the roller 90 degrees and paint again, so that you can blend the paint and create a smooth, even look. Repeat the process until your entire ceiling is covered.
Painting the ceiling might not be many people’s definition of fun. Using the best paint and materials you can afford and really taking your time with the project means you’ll have a new coat of paint that will look great for years to come.
[cf]skyword_tracking_tag[/cf]